
pocket door guide installation
Pocket Door Guide Installation: A Comprehensive Plan

Navigating pocket door guide installation requires understanding various types – floor-mounted, top-mounted, adjustable, and fixed – alongside crucial size considerations.
Pocket doors represent a space-saving marvel, sliding seamlessly into the wall cavity, offering an elegant alternative to traditional swinging doors. Their installation, however, demands precision, particularly concerning pocket door guide installation. These guides are pivotal for smooth operation, preventing binding and ensuring longevity. Understanding the nuances of different types – floor, top, adjustable, and fixed – is paramount.
Selecting the correct guide, alongside appropriate door size considerations, directly impacts the final result. Proper pocket door roller selection, and meticulous track alignment are also essential components of a successful installation. This guide will comprehensively cover each step, from preparation to completion.
Understanding Pocket Door Components
Pocket door systems comprise several key elements, all influencing successful pocket door guide installation. The door slab itself dictates guide compatibility, while the pocket door frame kit establishes the structural foundation. Crucially, the hardware – specifically the track and rollers – interacts directly with the guides.
Different types of tracks (steel, trolley, aluminum) necessitate specific guide choices. Understanding how these components work in concert is vital. Proper guide channel installation and cover plate fitting contribute to a polished finish and smooth operation, preventing issues like door binding.
Door Slab Selection
Choosing the right door slab is fundamental to successful pocket door guide installation. Slab thickness impacts guide clearance, and the bottom edge requires preparation – often a ¼-inch kerf for floor-mounted guides. Standard sizes are around 36 inches, but custom dimensions are possible;
Material selection (wood, MDF, etc.) affects weight and stability, influencing roller and guide load capacity. Ensure the slab is perfectly square to prevent binding. The slab’s finish should also be considered, as it may need adjustments during guide channel installation to accommodate the guide’s profile.

Pocket Door Frame Kits
Pocket door frame kits simplify pocket door guide installation, offering pre-cut lumber for the rough opening and pre-drilled holes for track mounting. Field-building a pocket frame is an alternative, but kits minimize errors and save time.
Kits vary in quality; prioritize those with robust framing and accurate pre-drilling. Ensure the kit’s dimensions match your chosen door slab size. Proper framing the rough opening is crucial for a square and level installation, directly impacting smooth operation and guide alignment. Consider the kit’s compatibility with your selected pocket door hardware.
Pocket Door Hardware: A Detailed Overview
Pocket door guide installation hinges on selecting appropriate hardware. This includes the track system – steel double-track, trolley, or aluminum – and, critically, the door guides themselves. Guides prevent the door from swaying and ensure smooth sliding.
Hardware quality directly impacts longevity and performance. Consider pocket door roller types, like standard or ball-bearing rollers, for optimal operation. Don’t overlook the guide channel installation and cover plates for a finished look. Accurate hardware selection is paramount for a successful and durable pocket door system.
Types of Pocket Door Guides
Pocket door guide installation necessitates understanding guide variations. Floor-mounted guides require a kerf cut into the door’s bottom edge, providing stability. Top-mounted guides attach to the door’s upper edge, working in conjunction with the track.
The choice between adjustable guides and fixed guides depends on installation precision and potential future adjustments. Adjustable guides allow for fine-tuning, while fixed guides offer simplicity. Selecting the correct guide type is crucial for preventing binding and ensuring smooth, reliable operation of the pocket door.
Floor-Mounted Guides

Floor-mounted guides, essential for pocket door guide installation, offer robust stability by engaging directly with the floor. These guides typically require a precise 1/4-inch kerf (groove) cut into the bottom edge of the door slab, allowing the guide to sit flush and prevent tilting.
Nylon swivel guides are a common choice, providing smooth gliding action. Proper alignment is critical during installation to avoid friction and ensure the door operates silently. They are particularly useful for heavier doors, minimizing stress on the track system and enhancing overall durability.
Top-Mounted Guides
Top-mounted guides play a vital role in pocket door guide installation, working in tandem with the track system to maintain vertical alignment. These guides are typically integrated into the header of the pocket door frame, ensuring the door remains stable throughout its travel.
They often consist of a channel or roller assembly that engages with the door’s top edge. Precise positioning is crucial to prevent binding or uneven operation. While generally suitable for lighter doors, robust top guides can support heavier slabs when combined with quality track hardware.
Adjustable Guides vs. Fixed Guides
Choosing between adjustable and fixed guides is key during pocket door guide installation. Fixed guides offer simplicity and cost-effectiveness, providing a consistent alignment point, but lack flexibility for adjustments post-installation.
Adjustable guides, however, allow for fine-tuning the door’s height and alignment, compensating for slight imperfections in the framing or floor. This adjustability is invaluable for ensuring smooth operation and preventing binding. They are particularly useful for heavier doors or installations where precision is paramount, offering long-term convenience.
Tools and Materials Required
Successful pocket door guide installation demands a specific toolkit. Essential tools include a measuring tape, level, stud finder, drill, screwdriver set, and a saw (circular or hand saw) for framing adjustments. Materials needed encompass the pocket door frame kit, door slab, pocket door hardware – including track systems and guides – wood screws, shims, and potentially drywall patching materials.
Don’t forget safety gear like safety glasses and gloves. Having these readily available streamlines the process and ensures a professional finish.
Preparing the Wall Opening
Proper wall preparation is crucial for a smooth pocket door installation. Begin by locating wall studs using a stud finder. Carefully frame the rough opening, ensuring it’s wide and tall enough to accommodate the chosen pocket door frame kit. Ensuring squareness and level is paramount; use a level and square to verify accuracy before proceeding.
If field-building the pocket, meticulous framing is key to avoid future frustrations. Adjust framing as needed, and remove any obstructions within the opening.
Framing the Rough Opening
Accurate framing dictates the pocket door’s functionality. The rough opening should be slightly wider and taller than the pocket door frame kit’s specifications – typically adding 2 inches to the width and 1 inch to the height. Utilize 2×4 lumber for framing, securely attaching it to existing wall studs.
Pay close attention to plumb and level during this stage. A poorly framed opening will lead to alignment issues and operational problems later. Reinforce the header to support the weight of the door and hardware, ensuring a stable structure.
Ensuring Squareness and Level
Critical for smooth operation, squareness and level are paramount during rough opening preparation. Use a framing square to verify 90-degree angles at all corners of the framed opening. Any deviation will cause binding or sticking. Employ a level – both vertically and horizontally – to confirm plumb walls and a level header.
Shim as needed to correct imperfections before securing the framing. A laser level can significantly improve accuracy. Remember, a solid, square, and level foundation is essential for successful pocket door installation and long-term performance.
Installing the Pocket Door Frame
Begin by carefully positioning the pocket door frame within the prepared rough opening, ensuring it’s flush with the finished wall surface. Secure the frame to the studs using appropriate screws – typically 3-inch screws are recommended. Double-check for plumb and level before fully tightening.
Many kits suggest field-building the pocket, offering customization. Pay close attention to manufacturer instructions, as variations exist. Proper frame installation is foundational; a misaligned frame guarantees operational issues. Confirm stability before proceeding to track installation.
Installing the Pocket Door Track
Securely mount the chosen track system – steel double-track, trolley, or aluminum – within the installed pocket door frame. Ensure the track is perfectly level; even slight deviations cause binding. Follow the manufacturer’s guidance for screw placement and type.
Double-track systems offer enhanced stability, while trolley tracks provide smoother gliding. Aluminum tracks are lightweight but may require additional support. Verify the track’s integrity before hanging the door slab, as it bears the entire weight. Proper track installation is vital for seamless operation.
Steel Double-Track Systems
Steel double-track systems provide superior strength and stability for heavier door slabs, minimizing wobble and ensuring long-term durability. These systems utilize two parallel tracks, distributing the weight evenly and reducing stress on the rollers. Installation requires precise alignment to prevent binding.
They are ideal for high-traffic areas or doors with intricate designs. While robust, steel tracks can be noisier than aluminum alternatives. Proper lubrication is crucial for smooth operation. Consider steel for demanding applications where reliability is paramount.
Trolley Track Systems
Trolley track systems employ wheeled trolleys that run within the track, offering a smooth and quiet sliding action. These systems are particularly well-suited for lighter-weight doors and provide excellent weight distribution. Installation typically involves securing the track to the header and ensuring the trolleys are properly aligned.
Trolley systems often feature adjustable components, allowing for fine-tuning and minimizing door binding. Regular inspection of the trolleys is recommended to ensure optimal performance and longevity. They represent a balance between affordability and functionality.
Aluminum Track Systems
Aluminum track systems are gaining popularity due to their lightweight nature and resistance to corrosion, making them ideal for environments with higher humidity. These systems often feature a sleek, modern aesthetic and are compatible with various door weights, depending on the track’s gauge and design.

Installation involves precise alignment and secure fastening to the header. Aluminum tracks generally require less maintenance than steel options. They offer a cost-effective solution without sacrificing durability, providing a smooth and reliable sliding experience for pocket doors.
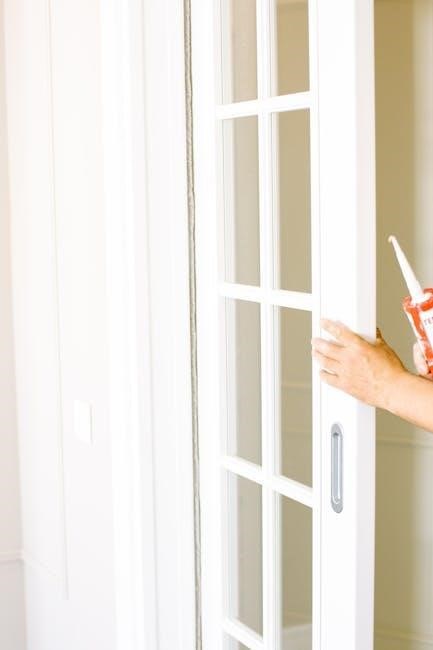
Installing the Door Guides
Proper door guide installation is critical for smooth pocket door operation and preventing issues like binding or swaying. Floor guide installation typically requires a kerf cut into the bottom of the door to accommodate the guide, ensuring it remains centered.
Top guide installation involves securely attaching the guide to the door’s upper edge, aligning it with the track. Precise alignment is paramount; incorrect placement can lead to operational problems. Regularly check and adjust guides for optimal performance and longevity of the system.
Floor Guide Installation Process
Begin the floor guide installation by carefully marking the door’s bottom edge for the required ¼-inch kerf. Utilize a router or chisel to create this groove, ensuring a precise fit for the chosen guide. Next, insert the floor guide into the kerf, verifying it’s flush with the door’s surface.
Secure the guide with screws, if applicable, or adhesive, depending on the model. Confirm the guide smoothly interacts with the floor, allowing the door to slide freely without friction. A properly installed floor guide prevents door sagging and ensures stable operation.
Top Guide Installation Process
Initiate the top guide installation by aligning the guide channel within the pocket door frame, ensuring it’s perfectly vertical and level. Securely fasten the channel to the frame using screws appropriate for the frame material – wood or metal. Verify the channel’s stability, as it bears the door’s weight.
Insert the door’s top edge into the guide channel, confirming smooth movement. Adjust the guide’s position if needed to eliminate binding. A correctly installed top guide maintains door alignment and prevents it from lifting off the track during operation.
Hanging the Door Slab
Carefully lift the door slab and align the rollers with the pocket door track. Gently guide the door into the track, ensuring the rollers seat correctly within the channel. A slight upward tilt often facilitates this process. Once inside, verify the door hangs straight and moves freely along the track.
Inspect for any obstructions or binding points. If resistance is encountered, re-check the track alignment and roller seating. Proper hanging is crucial for smooth, quiet operation and prevents premature wear on the rollers and track system, ensuring longevity.
Adjusting the Door for Smooth Operation
Fine-tune the door’s operation by utilizing the adjustable guides. These allow for vertical and horizontal adjustments, correcting minor misalignments. Tighten or loosen screws to achieve a flush fit within the frame, eliminating binding or sticking. Regularly check the floor guide for proper contact, ensuring smooth sliding.
Address any track alignment issues by gently bending the track, if necessary. Lubricate rollers with silicone spray to reduce friction and noise. Consistent adjustments guarantee effortless gliding and extend the lifespan of your pocket door system, providing years of reliable use.
Addressing Common Installation Issues
Encountering problems? Door binding or sticking often stems from improper alignment or insufficient adjustments to the guides. Carefully inspect the track for obstructions and ensure the floor guide maintains consistent contact. Track alignment problems can be resolved by gently bending the track, but avoid excessive force.
If issues persist, re-evaluate the framing’s squareness and level. Lubricating rollers can alleviate friction. Addressing these common hurdles promptly prevents further complications and guarantees a smoothly functioning pocket door, enhancing its usability and longevity.
Door Binding or Sticking
A common frustration, door binding often indicates misalignment within the system. First, meticulously check the floor guide’s engagement – is it consistently contacting the door’s bottom edge? Inspect the track for debris or bends obstructing the rollers’ path.
Insufficient lubrication can also contribute; apply a silicone-based lubricant to the rollers and track. If binding persists, slightly adjust the guide channel or consider shimming the track for optimal alignment. Remember, gentle adjustments are key to resolving this issue without causing further damage.
Track Alignment Problems
Misaligned tracks are a frequent cause of pocket door malfunctions. Begin by verifying the frame’s squareness and levelness – deviations here directly impact track performance. Use a level to confirm both horizontal and vertical alignment.
Inspect the track itself for any warping or damage. If the track is bent, carefully attempt to straighten it, or consider replacement. Ensure the track is securely fastened to the frame, preventing unwanted movement. Precise alignment is crucial for smooth, reliable door operation, avoiding binding and sticking.
Pocket Door Roller Types
Pocket door rollers are essential for smooth operation, with two primary types available: standard and ball bearing rollers. Standard rollers are more affordable but may exhibit increased friction, potentially leading to noise and wear.
Ball bearing rollers, conversely, offer significantly reduced friction, resulting in quieter, smoother gliding action and extended lifespan. When selecting rollers, consider the door’s weight and frequency of use; heavier doors benefit greatly from the enhanced performance of ball bearing rollers. Proper roller selection is key.

Standard Rollers
Standard pocket door rollers represent a cost-effective solution for lighter-weight doors and less frequent use. These rollers typically feature a simple wheel design, often made of plastic or nylon, operating directly on the track.
While adequate for basic applications, they can exhibit higher friction compared to ball bearing alternatives, potentially leading to noticeable noise during operation and increased wear over time. Regular inspection and occasional lubrication are recommended to maintain performance. They are a viable option when budget is a primary concern.
Ball Bearing Rollers
Ball bearing rollers offer a significant upgrade in smoothness and durability for pocket doors, especially those used frequently or with heavier door slabs. These rollers incorporate miniature ball bearings within the wheel assembly, drastically reducing friction and ensuring quieter, effortless gliding along the track.
The enhanced performance justifies a higher initial cost, as they minimize wear and tear on both the rollers and the track itself. Regular maintenance is still beneficial, but less frequent than with standard rollers, providing long-term reliability.
Guide Channel Installation
Guide channel installation is a critical step ensuring vertical stability and preventing the pocket door from twisting or derailing during operation. Typically, these channels are mounted to the floor, providing a secure track for the bottom edge of the door to follow.
Precise alignment is paramount; any deviation can cause binding or uneven movement. The channel requires a kerf – a narrow groove – cut into the bottom of the door, accommodating the channel’s profile. White nylon swivel guides are often used within the channel for smooth operation.

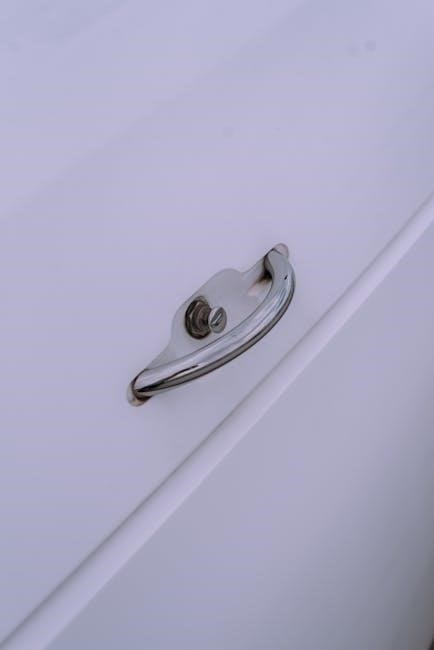
Door Guide Cover Plate Installation
Door guide cover plate installation represents the finishing touch, concealing the guide channel and enhancing the aesthetic appeal of the pocket door system. These plates, often made of metal or matching wood veneer, snap or screw into place over the installed guide channel.
Proper installation ensures a clean, seamless look, hiding the functional components while maintaining accessibility for future maintenance or adjustments. Securely fastening the cover plate prevents rattling and provides a polished appearance, completing the pocket door installation process effectively.
Pocket Door Size Considerations
Pocket door size considerations are paramount for a successful installation. Standard doors typically measure 36 inches, but custom widths are frequently available to suit specific openings. Door thickness impacts the required pocket depth within the wall; careful measurement is crucial.
The selected door size directly influences the amount of framing material needed and the overall project cost. Accurate sizing prevents binding or sticking, ensuring smooth operation. Considering these factors early streamlines the installation process and guarantees a functional, aesthetically pleasing result.
Pocket Door Types and Applications
Pocket doors offer versatile applications, ranging from bedrooms and bathrooms to closets and pantries, maximizing space efficiency. Different types cater to varied needs; standard bypass doors are common, while specialized options include barn-style or frosted glass designs.
Understanding these variations is key to selecting the right door for your project. Applications requiring privacy benefit from solid-core doors, while decorative styles enhance aesthetic appeal. Proper selection ensures functionality and complements the room’s overall design.
Maintaining Your Pocket Door System
Regular maintenance ensures smooth operation and longevity of your pocket door. Periodically clean the track and guides, removing dust and debris that can cause binding. Inspect rollers for wear and tear, replacing them as needed – ball bearing rollers offer enhanced durability.
Lubricate the track with silicone spray to reduce friction. Address any sticking or binding promptly to prevent further damage. Consistent care safeguards your investment and maintains effortless functionality, ensuring years of reliable use.
Troubleshooting Pocket Door Problems
Common issues include door binding or sticking, often caused by misaligned guides or a warped door slab. Check the track alignment; ensure it’s level and free of obstructions. If the door scrapes, adjust the floor guide or top guides for optimal positioning.
Inspect rollers for damage and replace if necessary. A properly installed guide channel is crucial; verify its secure attachment. Addressing these problems promptly prevents further complications and restores smooth, quiet operation of your pocket door system.
Safety Precautions During Installation
Prioritize safety when installing pocket door guides! Always wear safety glasses to protect against debris. Use work gloves to prevent cuts from sharp edges of the track and door slab. Ensure the power is switched off before working near electrical wiring within the wall cavity.
Support the door securely during installation to prevent accidental drops. Be mindful of pinch points when adjusting guides. Follow manufacturer’s instructions carefully and utilize appropriate tools for the task. A stable work environment is essential for a safe installation.
Cost Estimation for Pocket Door Installation
Estimating costs for pocket door guide installation varies significantly. A basic kit, including the door, track, and guides, ranges from $200 to $600. Floor-mounted guides and adjustable options typically add $20-$50 to the cost. Professional installation can add $300-$800, depending on the complexity and wall preparation needed.
Additional expenses include framing lumber if the rough opening requires modification, and finishing materials like trim and paint. Consider the cost of tools if you’re undertaking a DIY project. Budgeting $500-$1500 provides a reasonable estimate.
Advanced Pocket Door Features
Beyond basic installation, advanced features enhance pocket door functionality. Soft-close mechanisms, integrated into the track or guides, prevent slamming and add luxury, costing $50-$150. Bi-directional guides allow the door to open from either side, increasing flexibility. Some systems include integrated lighting within the frame.
High-end pocket door kits may feature premium roller types like ball-bearing rollers for smoother, quieter operation. Consider these upgrades during planning, as they often require specific guide channel installation techniques.
Pocket Door Alternatives
When pocket door installation proves challenging, several alternatives exist. Barn doors offer a rustic aesthetic and simpler installation, bypassing the need for wall framing. Bifold doors are space-saving but require sufficient swing space. Traditional swing doors remain a viable option, though they consume more floor area.
Sliding barn-style doors can be a stylish substitute, avoiding complex track systems. Carefully assess your space and desired aesthetic before committing to a pocket door, considering these alternatives’ installation complexities.
DIY vs. Professional Installation
Deciding between DIY and professional pocket door guide installation hinges on your skillset. DIY offers cost savings but demands precise framing, track alignment, and door adjustment. Missteps can lead to door binding or operational issues. Professionals bring expertise, ensuring accurate installation and addressing potential complications.
Consider the complexity of your wall structure and comfort level with power tools. While kits simplify the process, a professional guarantees a smooth, reliable outcome, especially for intricate pocket door systems, saving time and frustration.
A successfully installed pocket door, guided by careful planning and execution, adds both functionality and style to your space. Proper guide installation ensures smooth, quiet operation, eliminating common issues like door sticking. Regular maintenance, including roller checks and track cleaning, will prolong its lifespan.
Whether you chose the DIY route or professional assistance, relish the space-saving benefits and modern aesthetic; Enjoy the convenience of a seamlessly integrated door, enhancing your home’s flow and design.