
presto 23 qt pressure canner manual
Presto 23 Quart Pressure Canner: A Comprehensive Guide

Welcome! This guide details safe food preservation using your Presto 23-quart pressure canner, ensuring delicious, shelf-stable results for years to come․
Pressure canning is a remarkably effective method for preserving low-acid foods – think vegetables, meats, poultry, and seafood – ensuring their safety and extending their shelf life significantly․ Unlike boiling water canning, which is suitable only for high-acid foods, pressure canning reaches temperatures high enough to destroy Clostridium botulinum spores, the bacteria responsible for the potentially fatal botulism toxin․
This process involves heating food in sealed jars inside a pressurized canner, creating an environment of 240°F (116°C) or higher․ Properly executed pressure canning safeguards your family from foodborne illnesses and allows you to enjoy the bounty of your garden or bulk purchases throughout the year․ It’s a time-honored tradition, offering independence and control over your food supply․ Understanding the principles and following established guidelines are crucial for success and, most importantly, safety․
This guide focuses specifically on utilizing the Presto 23-quart pressure canner, providing detailed instructions and best practices for achieving consistently safe and delicious canned goods․
Why Choose the Presto 23 Quart?
The Presto 23-quart pressure canner is a popular choice among both beginner and experienced canners, and for good reason․ Its generous 23-quart capacity allows you to process larger batches of food, saving you time and energy, particularly during peak harvest seasons․ Constructed from heavy-gauge aluminum, it ensures even heating and durability for years of reliable use․
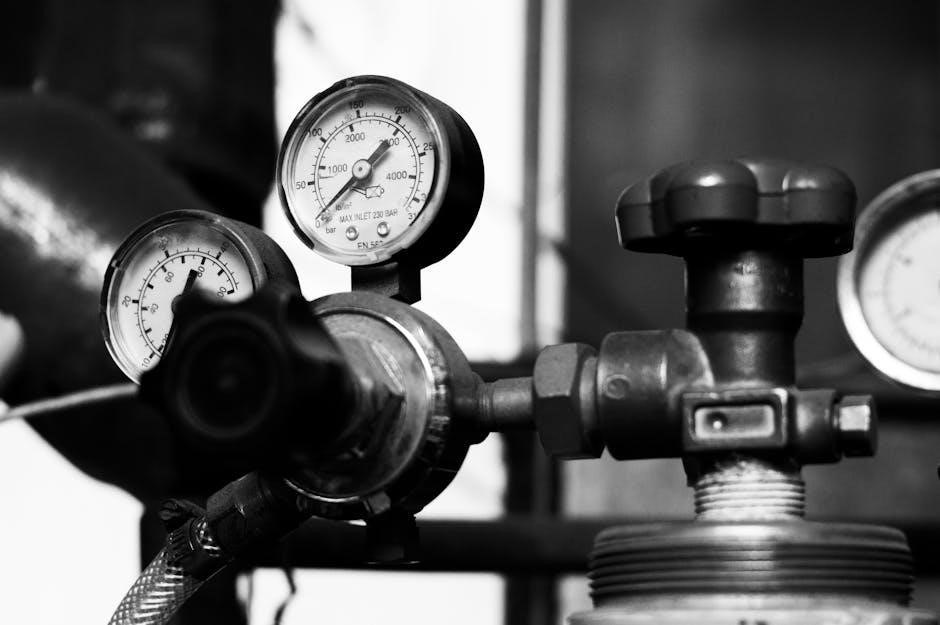
This model features a simple, easy-to-understand dial gauge for accurate pressure monitoring, a critical component of safe canning․ It’s also compatible with both electric and gas stovetops․ Presto’s commitment to safety is evident in its design, incorporating features like a locking lid and a pressure regulator․
Furthermore, the Presto 23-quart is relatively affordable, making it an accessible option for those new to pressure canning․ Its widespread availability and readily accessible replacement parts contribute to its long-term value and user satisfaction․

Understanding Your Presto 23 Quart Canner
Familiarize yourself with all parts! Knowing each component of your Presto canner is vital for safe and successful food preservation practices․
Components and Parts Identification
Let’s identify the key components of your Presto 23 Quart Pressure Canner․ The main body is constructed from heavy-gauge aluminum for even heat distribution․ You’ll find a secure-seal lid with a clamping mechanism, ensuring a tight closure during processing․
Essential parts include the pressure regulator – available in different weights (10 & 15 PSI) – which controls internal pressure․ The pressure gauge accurately displays the pressure inside the canner․ A safety lock prevents the lid from being opened while pressure remains․
Inside, you’ll find a canning rack to elevate jars above the water level for proper heat circulation; The steam vent/cover directs steam away from you during venting․ Finally, the pour spout allows for easy water addition and removal․ Understanding each part’s function is crucial for safe operation and optimal results․ Refer to diagrams in your manual for visual clarification․
Safety Features Explained
Your Presto 23 Quart Canner incorporates several vital safety features․ The lid locking mechanism prevents accidental opening while pressurized, safeguarding against burns and potential injury․ The overpressure plug, a crucial safety device, automatically releases excess pressure if the regulator fails, preventing explosions․
The steam vent guides steam away from the user during the venting process, minimizing burn risks․ The robust construction of the canner itself, using heavy-gauge aluminum, ensures durability and resistance to pressure․
Always ensure the vent is clear of obstructions․ Never attempt to force the lid open; allow the canner to cool completely and the pressure to return to zero․ Familiarize yourself with these features and their functions – they are paramount for safe and successful canning․ Regular inspection of these components is also recommended․
Initial Setup and Inspection
Before your first use, thoroughly inspect your Presto 23 Quart Canner․ Remove all packaging materials and wash the canner, lid, and rack with warm, soapy water․ Carefully examine the gasket for cracks, nicks, or hardening; replace if damaged․ Inspect the vent pipe and overpressure plug for any obstructions – ensure they are clear․
Verify the pressure regulator (weight) is clean and moves freely․ Check the lid for dents or warping that could compromise the seal․ Ensure the handles are securely attached․
Read the entire instruction manual before proceeding․ A practice run with water is recommended to familiarize yourself with the venting and pressurizing process․ Proper initial setup and inspection are crucial for safe and effective operation․
Preparing for Canning: Essential Steps
Success relies on preparation! Properly sterilizing jars, preparing food, and adjusting recipes for altitude are vital for safe, long-term preservation․
Jar Preparation: Sterilization & Inspection
Ensuring jar integrity is paramount․ Before canning, thoroughly wash jars in hot, soapy water, then rinse completely․ Inspect each jar for cracks, chips, or any visible damage – discard any flawed jars․ Sterilization is crucial to eliminate microorganisms․
For processing times of 10 minutes or less, sterilization isn’t strictly necessary, but recommended for best results․ To sterilize, place clean jars in a large pot, cover with water, and bring to a boil․ Boil for 10 minutes at altitudes below 1,000 feet, adding 1 minute for each additional 1,000 feet․
Keep jars hot until filling․ Alternatively, run jars through a dishwasher cycle with a sanitizing option․ Lids require separate preparation; heat them in simmering (not boiling) water to soften the sealing compound․ Never boil lids, as this can compromise the seal․ Always use new lids for each canning session․
Food Preparation Guidelines
Proper food preparation is key to safe canning; Always use fresh, high-quality ingredients․ Wash all produce thoroughly to remove dirt and debris․ Follow tested recipes precisely; altering ingredient ratios can affect safety․
For low-acid foods like vegetables and meats, precise adherence to recommended processing times is critical to eliminate Clostridium botulinum spores․ Pack foods tightly into jars, leaving the recommended headspace (the space between the food and the lid)․
Remove air bubbles by gently running a non-metallic spatula around the inside of the jar․ Wipe jar rims clean with a damp cloth to ensure a proper seal․ Hot-pack methods (briefly heating food before jarring) are often recommended for certain foods to improve color, flavor, and reduce shrinkage during processing․ Raw-packing is acceptable for some recipes, but processing times may differ․
Recipe Selection & Adjustments for Altitude
Choosing reliable recipes is paramount․ Utilize resources from the USDA Complete Guide to Home Canning, the National Center for Home Food Preservation, or Presto-approved recipes․ Never deviate from tested formulations․
Altitude significantly impacts boiling points, and therefore, processing times․ As elevation increases, water boils at a lower temperature, requiring longer processing to achieve adequate sterilization․
Adjust processing times based on your altitude․ Recipes will typically provide charts indicating adjustments needed for different elevation ranges (0-1,000 ft, 1,001-2,000 ft, 2,001-4,000 ft, and above 4,000 ft)․ Increasing the pressure, or extending the processing time, compensates for the lower boiling point․ Failure to adjust for altitude can result in under-processed food and a risk of botulism․

The Canning Process: Step-by-Step
Let’s begin! Carefully follow these instructions for safe and successful pressure canning, ensuring perfectly preserved foods every single time․
Loading the Canner: Jars & Water Level
Proper jar placement is crucial․ Place the canning rack inside the Presto 23-quart canner․ Carefully load filled jars onto the rack, ensuring they don’t touch each other or the canner’s sides; this allows for proper heat circulation․
Water level matters! Add hot water to the canner, covering the jars by at least one inch, or two inches for larger jars․ Refer to your recipe for specific liquid requirements – some recipes may call for broth or juice instead of water․
Important note: Do not overfill the canner․ Leave sufficient headspace for steam to circulate․ Secure the lid tightly, aligning the arrows as indicated in the manual․ Double-check that the lid is properly sealed before proceeding to venting․
Venting the Canner: Removing Air
Venting is a critical safety step! Before pressurizing, you must remove all air from the canner․ Place the weight on the vent pipe/steam vent․ Allow a steady, vigorous stream of steam to escape for exactly 10 minutes․
Why 10 minutes? This ensures all air is purged, creating an accurate pressure environment for safe canning․ The steam will initially appear white and erratic, then become a consistent, forceful white stream․
Timing is key! Start timing only when a steady stream of steam is visible․ After the 10-minute venting period, immediately place the pressure regulator (weight) onto the vent pipe to begin pressurizing the canner․ Failure to vent properly can lead to inaccurate processing times and potential food spoilage․
Pressurizing the Canner: Reaching Operating Pressure
After venting, place the weighted gauge (or selected weight for your recipe) securely on the vent pipe․ The canner will now begin to pressurize․ Monitor the pressure gauge closely․ The pressure will gradually rise; adjust the heat setting on your stove as needed to maintain a steady, but not excessively rapid, increase․
Achieving the correct pressure is vital! Refer to your recipe for the specific pressure required based on your altitude․ Once the gauge reaches the desired pressure, begin timing the processing time specified in your recipe․
Maintaining pressure is crucial․ Slight fluctuations are normal, but avoid significant drops or surges in pressure․ Adjust the burner heat to keep the gauge needle within the recommended range throughout the entire processing time․

Maintaining Pressure & Processing Time
Consistent pressure and accurate timing are key to safe canning; diligently monitor the gauge and adhere strictly to recipe guidelines for optimal results․
Monitoring Pressure During Processing
Consistent observation of the pressure gauge is paramount during the entire processing time․ The gauge indicates pounds per square inch (PSI), and maintaining the correct PSI – as dictated by your recipe and altitude – is crucial for food safety․
For weighted gauge models, observe the weight gently rocking or steaming steadily․ Avoid excessive or violent movement, which suggests pressure fluctuations․ Dial gauge models require frequent checks; note the reading and make small adjustments to the burner to maintain the target PSI․
Pressure will naturally fluctuate slightly․ Aim to keep the pressure within a narrow range – ideally, no more than +/- 1 PSI of the recommended value․ Record the processing time only when the correct pressure is consistently maintained․ Ignoring pressure fluctuations can lead to under-processing, risking spoilage, or over-processing, affecting food texture․
Adjusting Heat to Maintain Consistent Pressure
Maintaining stable pressure requires attentive burner adjustments throughout the processing time․ After reaching the desired PSI, you’ll likely need to reduce the heat input to prevent over-pressurization․ Small adjustments are key; avoid large, sudden changes․
If the pressure drops below the target range, slightly increase the heat․ Conversely, if the pressure rises too high, reduce the heat immediately․ Observe the gauge frequently – every few minutes – and make incremental adjustments as needed․
The ideal setting is one where the vent port maintains a steady, gentle stream of steam, indicating consistent pressure․ Different stovetops and fuel types will require varying heat settings․ Practice and observation will help you determine the optimal setting for your setup and recipe․ Remember, consistency is vital for safe canning!
Understanding Processing Times for Different Foods
Processing times vary significantly based on the food being canned, its acidity level, and jar size․ Low-acid foods – like vegetables, meats, and poultry – require longer processing times at higher pressures to eliminate the risk of botulism․ High-acid foods, such as fruits and pickles, need less time;
Always consult a reliable canning recipe from a trusted source (see Resources section)․ These recipes specify the correct processing time and pressure for each food․ Ignoring recommended times can lead to spoilage or, more seriously, foodborne illness․
Processing times are also adjusted for altitude․ Higher altitudes require increased processing times due to lower boiling points․ Refer to altitude adjustment charts in your recipe or the Presto manual to ensure safe preservation․ Accurate timing is paramount for food safety!

Cooling Down & Finalizing the Seal
Allow natural cooling or use a controlled quick-cooling method; listen for the lid to unlock, then check each jar for a proper vacuum seal․
Natural Cooling vs․ Quick Cooling Methods
Natural cooling involves letting the canner depressurize on its own, without any intervention․ This is the recommended method, as it minimizes the risk of siphoning – liquid loss from the jars․ It typically takes 30-60 minutes, or longer, depending on the canner’s contents and ambient temperature․ Patience is key with natural cooling!
Quick cooling, while faster, involves running cold water over the canner lid after the pressure gauge reaches zero․ This drastically reduces cooling time, but significantly increases the chance of siphoning and potential seal failures․ If quick cooling is necessary, do it cautiously and only after complete depressurization․ Never force the lid open; wait until it unlocks freely․ Remember, a properly sealed jar is paramount for food safety, and natural cooling generally yields better results․
Checking for Proper Seals
After cooling completely (at least 12-24 hours), verify each jar’s seal․ Press down on the center of the lid; if it flexes or pops up and down, the jar hasn’t sealed correctly․ A properly sealed lid will be concave and remain firm when pressed․ Remove the bands – if a lid lifts off with the band, it’s not sealed․
Unsealed jars require immediate attention․ You have a few options: reprocess with a new lid within 24 hours (using the original processing time), refrigerate the contents and use them promptly, or freeze the food․ Do not store unsealed jars at room temperature, as this poses a food safety risk․ Always label unsealed jars clearly with the date and contents․ Proper sealing is crucial for long-term preservation!
Troubleshooting Seal Failures
Several factors can cause canning seal failures․ Common culprits include nicks or cracks in the jar rim, improper headspace, food residue on the rim, or using old/damaged lids․ Ensure jars are free from defects and rims are clean before filling․ Accurate headspace is vital – follow recipe guidelines precisely․
Lid issues are frequent; always use new lids with each canning session․ Don’t overtighten bands, as this can cause buckling and prevent a proper seal․ If using two-piece lids, ensure the flat lid is centered on the jar․ High altitude adjustments are also critical for successful sealing․ If failures persist, double-check your entire process, from jar preparation to cooling, and consult reliable canning resources․

Safety Precautions & Maintenance

Prioritize safety! Regularly inspect your canner, follow instructions carefully, and maintain it properly for reliable, safe food preservation every time․
Common Canning Mistakes to Avoid
Preventing issues is key! Many canning failures stem from easily avoidable errors․ Underfilling jars leaves headspace insufficient for proper sealing, potentially leading to spoilage․ Conversely, overfilling can cause jars to bubble over during processing, creating a messy and unsafe situation․
Incorrect processing times, often due to altitude adjustments, are a frequent culprit; Always consult reliable recipes and adjust for your elevation․ Ignoring recipe guidelines regarding acidity levels – crucial for preventing botulism – is extremely dangerous․
Failing to properly vent the canner before pressurizing can result in inaccurate processing․ Using damaged jars or lids compromises the seal․ Finally, attempting to modify processing times or ingredients without expert guidance is strongly discouraged․ Careful attention to detail and adherence to tested recipes are paramount for safe and successful canning․
Cleaning and Storage of Your Canner
Proper care extends its life! After each use, thoroughly wash the Presto canner with warm, soapy water․ Pay close attention to the sealing ring and vent ports, removing any food particles․ Inspect the rubber gasket for cracks or damage; replace it annually or as needed․ The pressure gauge window should be cleaned gently with a soft cloth․
Avoid abrasive cleaners, as they can damage the finish․ Ensure the canner is completely dry before storing․ Store the canner in a clean, dry place, preferably with the lid slightly ajar to prevent odors․
Keep the operator’s manual readily accessible for future reference․ Store the rack inside the canner to prevent loss․ Regular maintenance ensures optimal performance and longevity of your Presto 23-quart pressure canner․
Troubleshooting Common Issues (e․g․, Stuck Lid, Gauge Problems)
Don’t panic! A stuck lid often results from a vacuum seal․ Gently try to rotate the lid back and forth while applying upward pressure․ Never force it․ For gauge issues, ensure it’s properly seated․ If the gauge reads zero, or fluctuates wildly, it likely needs replacing – contact Presto for a replacement․
If steam escapes excessively during pressurization, verify the sealing ring is correctly positioned and undamaged․ A slow pressure rise could indicate insufficient liquid․ Always double-check your water level․ If the vent pipe becomes clogged, carefully clean it with a pipe cleaner․
Refer to the manual for detailed diagrams and safety precautions before attempting any repairs․ Contact Presto customer support for complex problems․

Resources & Further Information
Expand your knowledge! Explore trusted canning resources for recipes, techniques, and support to maximize your Presto canner’s potential safely․
Recommended Canning Books & Websites
For beginners, “The Ball Blue Book Guide to Preserving” is an invaluable resource, offering detailed instructions and tested recipes for various canning methods, including pressure canning․ It’s a staple in many kitchens!
Experienced canners might appreciate “Putting Food By” by Janet Greene, Ruth Hertzberg, and Beatrice Vaughan, a comprehensive guide covering traditional preservation techniques․ It delves deeper into the science behind canning․
Online, the National Center for Home Food Preservation (nchfp․uga․edu) provides research-based recommendations and up-to-date information on safe canning practices․
The USDA Complete Guide to Home Canning (www․ams․usda․gov/publications/food-safety/complete-guide-home-canning) is another excellent, free resource directly from the United States Department of Agriculture․
Presto’s website also offers helpful tips and frequently asked questions, though it’s best to supplement with more detailed guides for comprehensive understanding․
Presto’s Official Support & Manual Access
For direct assistance, Presto offers customer support via phone at 1-800-807-1033, Monday through Friday․ Their representatives can address specific questions about your 23-quart canner and its operation․
The official Presto website (www․goPresto․com) is the primary source for accessing your canner’s manual․ Navigate to the “Support” or “Product Manuals” section and search for model 01781․
You can download a PDF version of the manual for convenient offline access․ This digital copy contains detailed instructions, safety guidelines, and troubleshooting tips․
Presto also provides a FAQ section on their website addressing common concerns․
Registering your product on their site allows Presto to notify you of important safety updates or recalls․ Always refer to the official manual for the most accurate and up-to-date information regarding your canner․
Frequently Asked Questions (FAQ)
Q: Can I use my Presto 23-quart canner for water bath canning? A: No, this model is specifically designed for pressure canning and cannot safely perform water bath canning․
Q: How often should I replace the gasket? A: Replace the gasket (rubber sealing ring) annually, or more frequently if it becomes brittle, cracked, or deformed․
Q: What does the “venting” step accomplish? A: Venting removes air from the canner, ensuring accurate pressure build-up for safe food preservation․
Q: My pressure gauge fluctuates – is this normal? A: Slight fluctuations are normal, but significant or erratic readings indicate a potential issue; consult the manual․
Q: Can I open the canner during processing? A: Absolutely not! Opening the canner during processing releases pressure and can cause food spoilage and dangerous situations․